

Monday, July 28, 2008
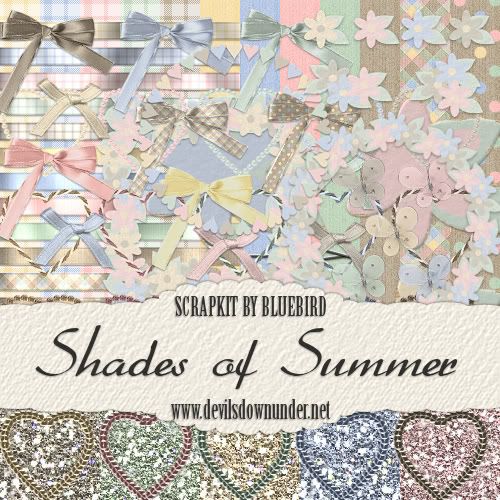
Shades of Summer Taggers Kit
It's winter here but I need to warm up lol. Hope you like it.
Kit Contains:
12 papers
5 glitter tiles
6 flower motifs
12 bows
12 ribbons
5 butterflies
20 heart accents
4 flower tags
1 heart frame
2 flower frames
DOWNLOAD HERE
Kit Contains:
12 papers
5 glitter tiles
6 flower motifs
12 bows
12 ribbons
5 butterflies
20 heart accents
4 flower tags
1 heart frame
2 flower frames
DOWNLOAD HERE
Thursday, July 17, 2008
Bow Tutorial and Commercial Use Freebies
HOW TO MAKE A BOW
There are lots of ways to get to the same result. This is how I make digital bows for my scrap kits and it involves real ribbon lol.
You will need:
* ribbon to tie a bow with
* scanner/digital camera
* a good knowledge of PSP (or graphics program of choice, I use PSPX)
* a patterned scrap paper of choice
Lets Start:
1. Take a length of ribbon and make a bow. If you google how to tie a bow, you will find instructions for tying some fancy bows too.
2. Scan or photograph your bow (I usually scan) transfer to your computer and open the file in PSP.
3. Duplicate your bow and add a new raster layer between the two bow layers. Floodfill the new layers with #0000ff. Duplicating the bow is optional but the blue layer isn't. I duplicate the bow in case I make a mistake and cut too much off. This way I can easily cut and paste bits back rather than start all over again.
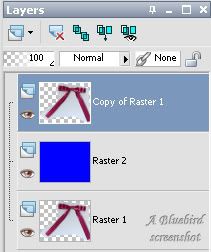
Make sure you are on the top layer. Zoom in on your bow so you can clearly see the edge - about 200- 300% depending on the size. Using your freehand selection tool on the following settings, carefully trace around the outside of edge of your bow. Right click to close the selection. Selections - Invert - press the delete key twice.

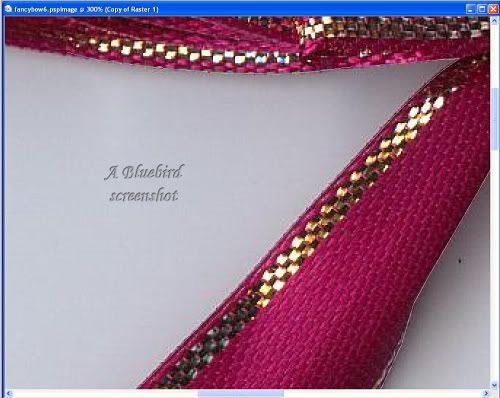
4. Click on the blue layer and floodfill with different colours to make sure you have removed enough of the background. If there are any little blemishes on your bow, you can tidy them up with your clone tool. Keep the brush size to about the size of the blemish.
5. Once you are satisfied with your bow, delete the blue layer and the original layer.
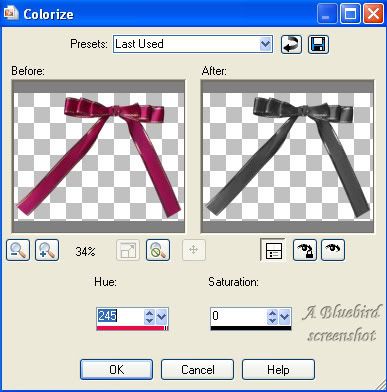
6. I make all my bows greyscale so I can use them in different kits (and inevitably, the colour is not right for the kit I'm doing anyway lol). Adjust menu - Hue and Saturation - Colorize. It doesn't matter what the hue is as long as saturation is on zero.
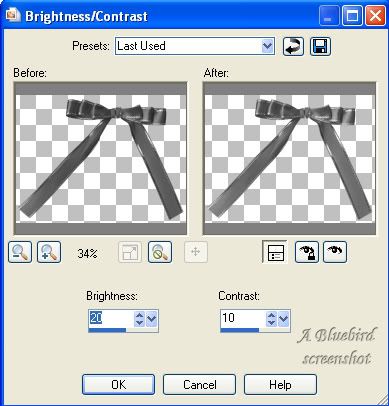
7. If the colour of your ribbon is too light or too dark, Adjust menu - Brightness and Contrast - Brightness/Contrast. Positive numbers for brighter, negative for darker in the Brightness. I usually keep the Contrast at about 10.
8. You may want to resize and sharpen (not too much) your bow at this point. Save your file and your bow is ready for use. Just colorize to match your kits. But how do you make patterned bows to match papers I hear you ask?
9. Shift + D to duplicate your bow file and close the original file. Duplicate the bow layer so that you have two. Close the top layer off and make sure the bottom layer is active. On your Materials Palette, make the foreground your patterned paper and the background colour the grey of your bow. You will need to scale the pattern down so the detail is not lost on the bows and how much you scale will depend on the size of the paper you use.
10. Use your colour replacer tool at the following settings and click on your bow. If you are not getting good coverage increase the tolerance. Click on the blue icon to colour all pixels on that layer.

11. You will notice that colouring this way does not give any definition to your bow. Activate your top bow layer and make it visible. Change the blend mode to hard light. To make the colour of your bow closer to your paper you can adjust brightness and contrast on the patterned layer and you can also lower the opacity of the top layer. Once satisfied with the colouring and definition of your bow, merge visible, save and you are done.
These two bows were coloured using one of the papers from the Bright and Beautiful Add On scaled to 60%. The overlay layer was at 70% (80% for second example) and the bottom layer had the Brightness and Contrast adjusted at the settings given above.
I hope you have enjoyed this tutorial.

Now for the freebie -
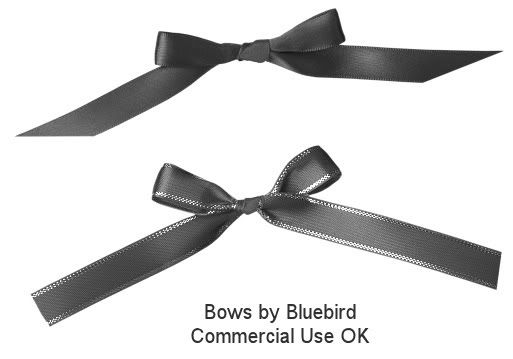
I have a couple of tagger sized commercial use ok bows for you to practise colouring. Commercial TOU are under my usual Terms of Use.
DOWNLOAD HERE
There are lots of ways to get to the same result. This is how I make digital bows for my scrap kits and it involves real ribbon lol.
You will need:
* ribbon to tie a bow with
* scanner/digital camera
* a good knowledge of PSP (or graphics program of choice, I use PSPX)
* a patterned scrap paper of choice
Lets Start:
1. Take a length of ribbon and make a bow. If you google how to tie a bow, you will find instructions for tying some fancy bows too.
2. Scan or photograph your bow (I usually scan) transfer to your computer and open the file in PSP.
3. Duplicate your bow and add a new raster layer between the two bow layers. Floodfill the new layers with #0000ff. Duplicating the bow is optional but the blue layer isn't. I duplicate the bow in case I make a mistake and cut too much off. This way I can easily cut and paste bits back rather than start all over again.
Make sure you are on the top layer. Zoom in on your bow so you can clearly see the edge - about 200- 300% depending on the size. Using your freehand selection tool on the following settings, carefully trace around the outside of edge of your bow. Right click to close the selection. Selections - Invert - press the delete key twice.
4. Click on the blue layer and floodfill with different colours to make sure you have removed enough of the background. If there are any little blemishes on your bow, you can tidy them up with your clone tool. Keep the brush size to about the size of the blemish.
5. Once you are satisfied with your bow, delete the blue layer and the original layer.
6. I make all my bows greyscale so I can use them in different kits (and inevitably, the colour is not right for the kit I'm doing anyway lol). Adjust menu - Hue and Saturation - Colorize. It doesn't matter what the hue is as long as saturation is on zero.
7. If the colour of your ribbon is too light or too dark, Adjust menu - Brightness and Contrast - Brightness/Contrast. Positive numbers for brighter, negative for darker in the Brightness. I usually keep the Contrast at about 10.
8. You may want to resize and sharpen (not too much) your bow at this point. Save your file and your bow is ready for use. Just colorize to match your kits. But how do you make patterned bows to match papers I hear you ask?
9. Shift + D to duplicate your bow file and close the original file. Duplicate the bow layer so that you have two. Close the top layer off and make sure the bottom layer is active. On your Materials Palette, make the foreground your patterned paper and the background colour the grey of your bow. You will need to scale the pattern down so the detail is not lost on the bows and how much you scale will depend on the size of the paper you use.
10. Use your colour replacer tool at the following settings and click on your bow. If you are not getting good coverage increase the tolerance. Click on the blue icon to colour all pixels on that layer.
11. You will notice that colouring this way does not give any definition to your bow. Activate your top bow layer and make it visible. Change the blend mode to hard light. To make the colour of your bow closer to your paper you can adjust brightness and contrast on the patterned layer and you can also lower the opacity of the top layer. Once satisfied with the colouring and definition of your bow, merge visible, save and you are done.
These two bows were coloured using one of the papers from the Bright and Beautiful Add On scaled to 60%. The overlay layer was at 70% (80% for second example) and the bottom layer had the Brightness and Contrast adjusted at the settings given above.
I hope you have enjoyed this tutorial.
Now for the freebie -
I have a couple of tagger sized commercial use ok bows for you to practise colouring. Commercial TOU are under my usual Terms of Use.
DOWNLOAD HERE
Saturday, July 12, 2008
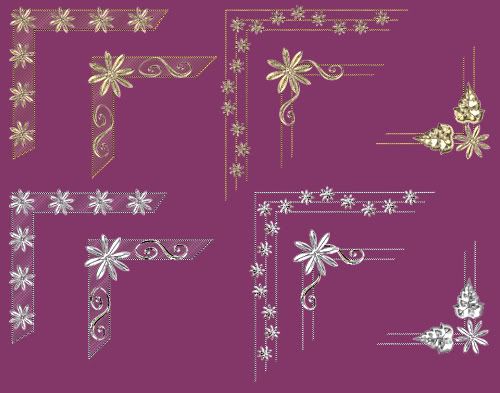
Daisy Chain Scrap Kit
Been busy with the camera today lol. The daisies are from my front garden - well in this case it is one daisy but I got a lot of mileage out of it!
Kit Contains:
* 16 papers
* 3 glitter tiles
* 7 ribbons
* 7 bows
* 6 corners
* 3 daisy motifs
* 2 daisy frames
* 3 daisy chains
* 1 small leaf accent
* 3 small flower accents
* 3 journal blocks
* 4 daisy gems
* 3 tags
* 3 glitter filled charms
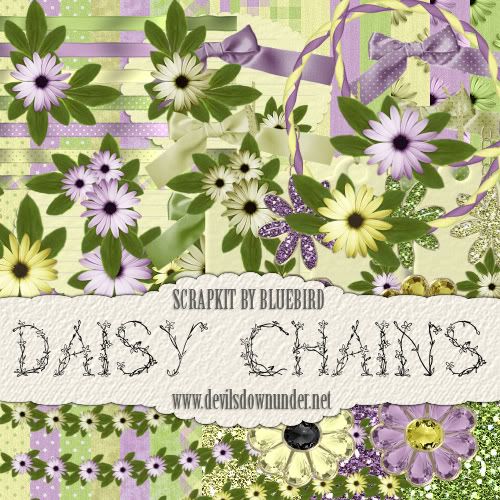
DOWNLOAD HERE
Kit Contains:
* 16 papers
* 3 glitter tiles
* 7 ribbons
* 7 bows
* 6 corners
* 3 daisy motifs
* 2 daisy frames
* 3 daisy chains
* 1 small leaf accent
* 3 small flower accents
* 3 journal blocks
* 4 daisy gems
* 3 tags
* 3 glitter filled charms
DOWNLOAD HERE
Sunday, July 6, 2008
Saturday, July 5, 2008
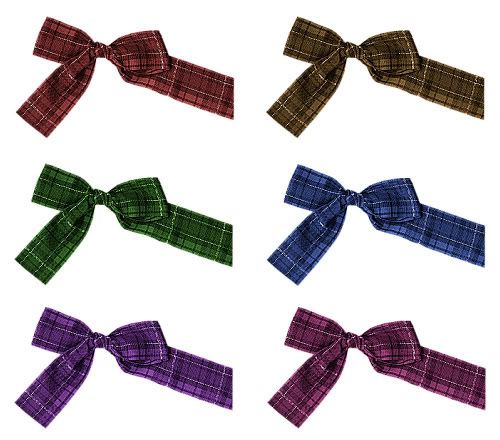
Tartan Ribbons
Been playing around with some ribbons - hope someone can use them lol. Preview is at about 60%.
DOWNLOAD HERE
DOWNLOAD HERE
Thursday, July 3, 2008
Pastels Sig Tag Tut
Again a big thanks to everyone who has left a comment either here or on my 4shared. It's great to read them 
Click on the tag for the sig tag tut using the Pretty Pastels kit -
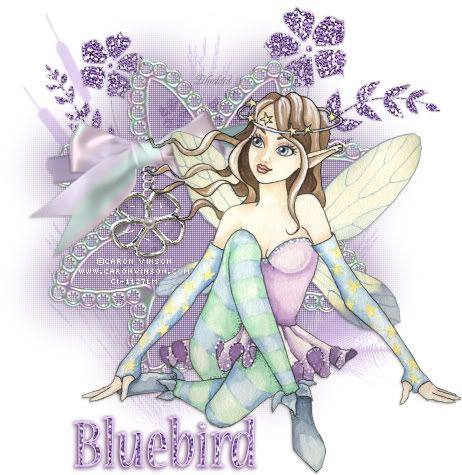
Click on the tag for the sig tag tut using the Pretty Pastels kit -
Wednesday, July 2, 2008
Pretty Pastels
They are probably a bit bright to be called pastels but close enough lol
Kit Contains:
* 12 papers
* 4 glitter tiles
* 8 bead strands
* 8 individual beads
* 4 bead flowers
* 12 bows
* 12 ribbons
* 5 doodles
* 1 gel alphabet
* 4 tags with a greyscale string tie
* 3 gel frames
* 2 silver frames
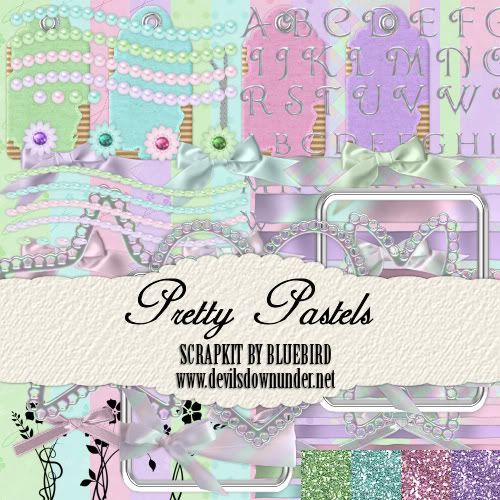
DOWNLOAD HERE
Kit Contains:
* 12 papers
* 4 glitter tiles
* 8 bead strands
* 8 individual beads
* 4 bead flowers
* 12 bows
* 12 ribbons
* 5 doodles
* 1 gel alphabet
* 4 tags with a greyscale string tie
* 3 gel frames
* 2 silver frames
DOWNLOAD HERE
Subscribe to:
Posts (Atom)